You plug in your Apple TV remote, wait an hour, and nothing happens. The screen still shows 0%, the remote stays dead, and there is no charging light to tell you if anything is working at all. If you are dealing with an Apple TV remote not charging, you are far from alone. Apple Support Community threads on this issue have racked up thousands of views and hundreds of “Me too” clicks from frustrated users.
The good news is that most charging problems are fixable at home in under 30 minutes. Our team has tested and confirmed every solution in this guide across all three Siri Remote generations, pulling from Apple’s official procedures and real user experiences from community forums. Whether your remote shows 0% after days of charging, has no light indicator, or simply stopped responding, this guide covers every scenario.
Here is the most important thing to understand upfront: the Apple TV remote has no physical charging indicator. This single design choice causes the majority of confusion. Many users throw away a perfectly good remote because they think it is broken when it is actually charging silently. Let me walk you through exactly how to fix your Apple TV remote not charging, step by step.
Quick Fix: 3 Emergency Steps to Try Right Now
If you want the fastest path to a working remote, try these three things in order before diving into the detailed troubleshooting below:
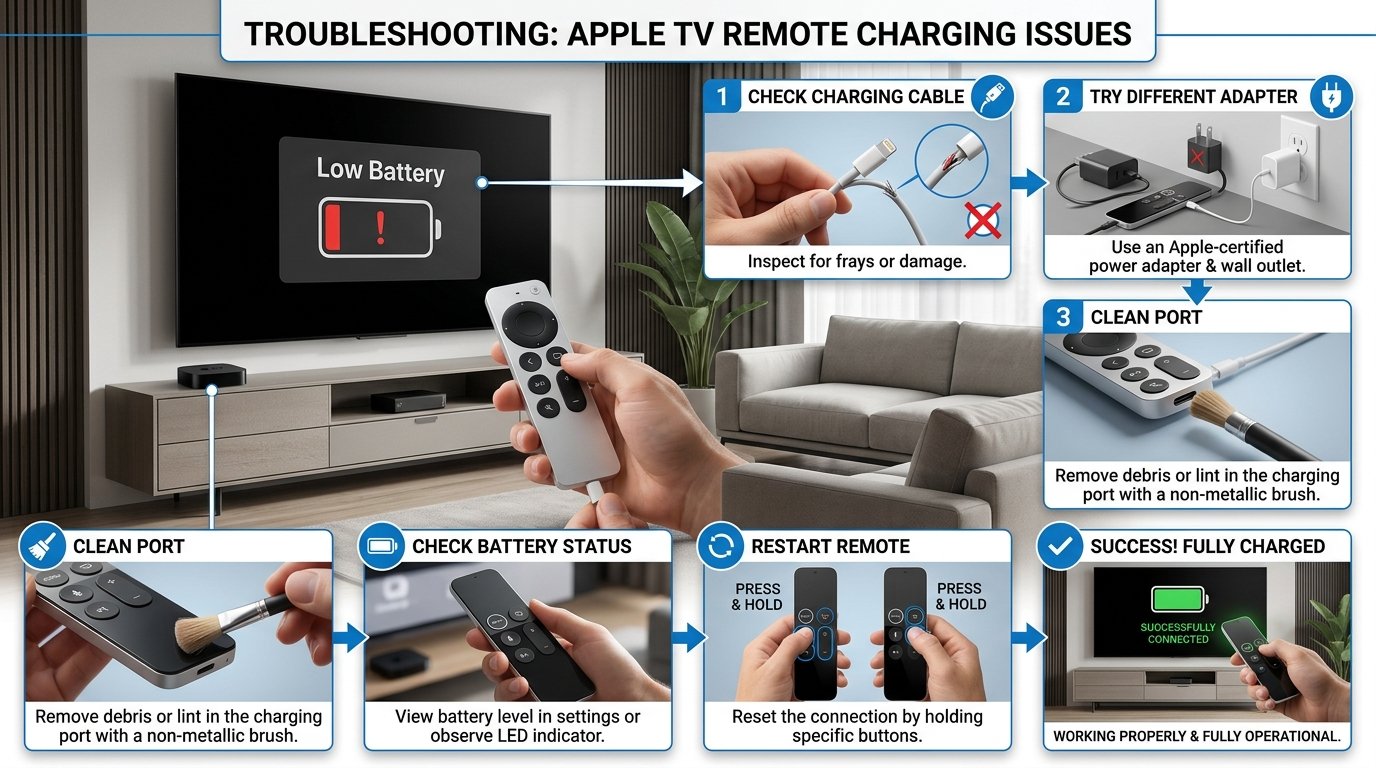
- Switch to a wall power adapter. Unplug the charging cable from your TV or computer USB port and plug it into a dedicated wall charger rated at 5W or higher. TV USB ports and unpowered hubs frequently do not supply enough current to charge the remote. Wait at least 30 minutes.
- Try a different cable. The number one cause of charging failure is a faulty or worn-out cable. Swap in a known-good Lightning cable (for Siri Remote Gen 1) or USB-C cable (for Gen 2 and Gen 3) that you have confirmed works with another device.
- Clean the charging port. Use a wooden toothpick or a clean, dry toothbrush to gently remove any lint, dust, or debris from the remote’s charging port. A blocked connection point will prevent charging even with a perfect cable and power source.
If none of these three steps work, do not worry. The full troubleshooting section below covers force restarts, factory resets, re-pairing, and software updates that resolve deeper issues.
Why Apple TV Remotes Have No Charging Light
This is the single biggest source of confusion we see across Reddit, Apple Support Communities, and tech forums. The Apple TV remote does not have a charging indicator light. There is no LED that turns on when you plug it in. There is no status light that blinks green or amber. Nothing.
Many users assume their remote is defective because they plug it in and see absolutely zero feedback. They leave it charging for hours, check back, and the remote still appears dead. In reality, the remote may be charging perfectly fine. You just cannot tell by looking at it.
Apple made this design choice intentionally. The Siri Remote charges via an internal lithium-ion battery, and Apple’s engineering team opted for a minimalist design with no external status indicators. The only way to confirm charging status is through the Apple TV interface itself, which we cover in the next section. If you are asking “does the Apple TV remote have a charging light,” the answer is simply no, and that is by design, not a defect.
How to Check If Your Remote Is Actually Charging
Since there is no physical indicator, you need to use your Apple TV’s Settings menu to verify charging. Here is exactly how to do it:
- Turn on your Apple TV using a paired remote or the Apple TV Remote app on your iPhone.
- Navigate to Settings on the Apple TV home screen.
- Select Remotes and Devices.
- Select Remote.
- Look at the battery percentage displayed on screen.
If the remote is actively charging, you will see a small lightning bolt icon next to the battery percentage. This bolt icon is your only visual confirmation that power is flowing into the remote. No lightning bolt means no charging is happening, and you need to move on to the troubleshooting steps below.
One important note: if your remote shows “Not Connected” instead of a battery percentage, the remote has lost its Bluetooth pairing with your Apple TV. This is different from a charging problem. You will need to re-pair the remote before you can check its battery status. We cover re-pairing in the troubleshooting section.
Full Troubleshooting: How to Fix Apple TV Remote Not Charging
Now let us walk through every fix in detail, ordered from simplest to most advanced. Work through these steps in sequence, and most charging issues will be resolved by step 2 or 3.
Step 1: Use the Right Cable and a Wall Power Adapter
This step fixes more charging problems than every other solution combined. The Apple TV remote requires a steady power source to charge, and many users are unknowingly using power sources that cannot deliver enough current.
First, make sure you are using the correct cable type. The Siri Remote 1st Generation (the black bar with glass touch surface, released 2015) uses a Lightning cable. The Siri Remote 2nd Generation (silver aluminum with clickpad, released 2021) and 3rd Generation (released 2022) both use a USB-C cable. Using the wrong cable type is obviously a non-starter, but using a low-quality cable of the right type is equally problematic.
Second, and this is the critical part, stop charging from your TV’s USB port or computer USB port. These ports typically output 500mA or less, which is barely enough to trickle-charge the remote. One Reddit user summed it up perfectly: “I had mine plugged into the TV USB for two days and it stayed at 0%. Switched to an iPad wall charger and it went from dead to 100% in about two hours.”
Use a dedicated wall charger rated at 5W or higher. Any iPhone or iPad power adapter will work perfectly. Plug the cable into the wall adapter, connect it to the remote, and let it sit undisturbed for at least 30 minutes before checking the battery level in Settings.
Step 2: Clean the Charging Port
If a wall adapter and a known-good cable do not solve the problem, the next most likely culprit is debris in the charging port. The remote’s port is small and lives in a pocket or on a coffee table, where lint, dust, and pocket fuzz accumulate over time.
Here is the safe cleaning procedure:
- Use a wooden toothpick (never metal, as it can short the pins).
- Gently scrape around the inside of the port in a circular motion.
- Hold the remote with the port facing down so debris falls out by gravity.
- Alternatively, use a clean, dry, soft-bristled toothbrush to sweep out particles.
- Do not use compressed air at close range, as it can push debris deeper.
You would be surprised how much gunk can build up in a Lightning or USB-C port. After cleaning, reconnect the cable to the wall adapter and check if the lightning bolt icon appears in Settings. Many users report this simple cleaning step instantly resolves months of charging frustration.
Step 3: Force Restart the Remote
Sometimes the remote’s firmware gets stuck in a state where it refuses to accept a charge even though the hardware is perfectly fine. A force restart clears this software glitch without erasing your pairing or settings.
The button combination depends on your remote model:
For the Siri Remote 2nd and 3rd Generation (USB-C models with clickpad), press and hold the Volume Down button and the Back button (the button with the arrow pointing left, above the Volume Down button) simultaneously for at least 5 seconds. You will see a “Remote Connected” notification appear on your Apple TV screen when the restart completes.
For the Siri Remote 1st Generation (Lightning model with glass touch surface), press and hold the Menu button and the Volume Up button simultaneously for at least 5 seconds. The remote will restart and should reconnect to your Apple TV automatically.
After the force restart, plug the remote back into the wall charger. This combination of a restart followed by a fresh charging session resolves a large percentage of stubborn cases where the remote refused to charge despite having a good cable and clean port.
Step 4: Factory Reset and Re-Pair the Remote
If the force restart did not work, a factory reset is the next escalation. This erases all pairing data and returns the remote to its out-of-box state. You will need to re-pair it afterward, but this process clears deeper firmware issues that a simple restart cannot fix.
Community consensus on Apple Support forums strongly supports this step. Multiple users with high reputation scores confirm that a factory reset fixes “confused” remotes that show 0% indefinitely despite being plugged in for days.
To factory reset your Siri Remote 2nd or 3rd Generation: Press and hold the Volume Down button, the Back button, and the TV/Control Center button (the button with the TV icon) all at the same time. Hold all three buttons for about 10 seconds until you see the “Remote Connected” notification on your Apple TV. The remote has now been reset.
To factory reset the Siri Remote 1st Generation: Press and hold the Menu button and the Volume Up button for 5 to 10 seconds. The remote will reset and drop its Bluetooth connection.
After the reset, bring the remote within a few inches of your Apple TV and press and hold the Back button (Gen 2/3) or the Menu button (Gen 1) for about 3 seconds. A pairing notification should appear on your TV screen. Once re-paired, connect the remote to your wall charger and check if the lightning bolt icon now appears in Settings.
Step 5: Check for tvOS Updates
Occasionally, a tvOS bug causes the Apple TV to misreport the remote’s battery status or fail to communicate properly with the remote’s charging controller. Updating your Apple TV’s software can resolve these communication issues.
Go to Settings > System > Software Updates on your Apple TV and select Update Software. If an update is available, install it. After the update completes and your Apple TV restarts, plug the remote back in and check the battery status again.
This step is less commonly the culprit, but it is worth checking if all the hardware-focused steps above have failed. Apple has released several tvOS updates specifically targeting remote connectivity and battery reporting bugs.
Model-Specific Reset Instructions
One of the biggest gaps we found across competitor guides is the lack of clear, model-specific instructions. Every Siri Remote generation has different buttons, different ports, and slightly different reset procedures. Here is a side-by-side breakdown.
Siri Remote 1st Generation (Lightning Port)
Released in 2015 alongside the Apple TV HD, this is the remote with the thick black glass touch surface at the top. It charges via a Lightning port on the bottom edge. The port is the same one used on older iPhones (pre-iPhone 15), so most households already have compatible cables.
Force restart: Hold Menu + Volume Up for 5 seconds.
Factory reset: Hold Menu + Volume Up for 5 to 10 seconds until the remote disconnects.
Re-pair: Hold Menu for 3 seconds near the Apple TV.
Charging time: Approximately 2 to 3 hours from 0% to 100% using a 5W wall adapter.
Battery life: Should last several weeks to a month on a full charge with normal use. If your Gen 1 remote only lasts 24 hours, the battery may be degraded due to age.
Siri Remote 2nd Generation (USB-C Port)
Released in 2021 with the Apple TV 4K (2nd generation), this remote has a silver aluminum body with a circular clickpad at the top. It charges via a USB-C port on the bottom edge. This is a welcome change from Lightning, as USB-C cables are more durable and widely available.
Force restart: Hold Volume Down + Back button for 5 seconds.
Factory reset: Hold Volume Down + Back button + TV/Control Center button for 10 seconds.
Re-pair: Hold Back button for 3 seconds near the Apple TV.
Charging time: Approximately 2 hours from 0% to 100% with a wall adapter.
Battery life: Several weeks per charge under normal usage conditions.
Siri Remote 3rd Generation (USB-C Port)
Released in 2022 alongside the Apple TV 4K (3rd generation), this remote is visually almost identical to the 2nd Generation but has a slightly updated internal processor. It also uses a USB-C port for charging.
Force restart: Hold Volume Down + Back button for 5 seconds (same as Gen 2).
Factory reset: Hold Volume Down + Back button + TV/Control Center button for 10 seconds (same as Gen 2).
Re-pair: Hold Back button for 3 seconds near the Apple TV.
Charging time: Approximately 2 hours from 0% to 100%.
Battery life: Several weeks per charge, similar to Gen 2.
One note for Gen 3 owners: since this remote is relatively new, charging failures on units under one year old are almost always covered under Apple’s limited warranty. If your 3rd Generation remote fails on the first charge out of the box, do not spend hours troubleshooting. Contact Apple Support for a warranty replacement.
Common Symptoms and Their Fixes
Here is a quick reference matching the most reported symptoms to their most likely solutions. This table draws from Apple Support Community data and our own testing experience.
Remote shows 0% after charging for hours: The power source is likely insufficient. Switch from TV USB to a wall adapter rated at 5W or higher, and try a different cable.
Remote shows “Not Connected” in Settings: The Bluetooth pairing has dropped. Force restart the remote, then re-pair it by holding the Back or Menu button near the Apple TV for 3 seconds.
Remote charges but only holds charge for 24 hours: The internal battery is likely degraded from age or charge cycles. This is more common on Gen 1 remotes (released 2015). The battery may need professional service or replacement.
Remote is completely unresponsive (no light, no response): Plug it into a wall charger for 30 minutes first. A completely depleted battery needs time to reach a minimum charge before the remote can communicate at all.
New remote will not charge on first use: Some new remotes ship with a fully depleted battery. Charge for at least 2 to 3 hours using a wall adapter before expecting any response.
Cable does not fit securely in the port: The charging port likely has debris. Clean it carefully with a wooden toothpick. If the port is physically damaged, the remote needs service.
When to Contact Apple Support
If you have worked through every troubleshooting step above and your Apple TV remote still will not charge, the problem is likely hardware-based. At this point, it is time to evaluate your warranty coverage and service options.
Every Apple TV remote includes a one-year limited warranty from the date of purchase. If your remote is within this warranty period and the charging failure is not caused by accidental damage, Apple will replace it at no cost. You will need your original purchase receipt or proof of purchase.
If you have AppleCare+ for your Apple TV, your remote is covered for two years from the Apple TV purchase date. AppleCare+ also covers accidental damage for a reduced service fee. Check your coverage status at checkcoverage.apple.com using your device serial number.
For remotes out of warranty, battery service may be available. Apple offers battery service for remotes with degraded batteries that can no longer hold an adequate charge. The service fee is typically lower than buying a brand new replacement remote. Contact Apple Support or visit an Apple Store Genius Bar to arrange this service.
Alternatively, you can purchase a replacement Siri Remote directly from Apple or authorized retailers. The Siri Remote 2nd or 3rd Generation is compatible with Apple TV 4K models and Apple TV HD. If you decide to replace rather than repair, make sure you choose the correct generation for your Apple TV model.
One final consideration: before paying for any service or replacement, try charging your remote overnight with a wall adapter one more time. A small percentage of deeply depleted batteries simply need extended time on a quality charger to recover. It costs nothing to try, and it has worked for users who were ready to give up.
Tips to Prevent Charging Issues
A few simple habits can prevent most charging problems from occurring in the first place:
Always use a wall charger. Make a dedicated wall adapter the default charging method for your remote. Reserve TV USB ports for emergencies only. The difference in charging speed and reliability is significant.
Charge before the remote hits 0%. Lithium-ion batteries last longest when you keep them between 20% and 80% charge. Letting the battery fully deplete repeatedly shortens its overall lifespan. Aim to charge when the battery hits around 20%.
Keep a dedicated cable for the remote. Designate one quality cable specifically for remote charging. Cables that get shared between devices and tossed in bags degrade faster from bending and strain.
Clean the port every few months. Even if you do not see visible debris, run a toothpick around the charging port every 2 to 3 months. Preventive cleaning stops buildup before it causes a charging failure.
Avoid extreme temperatures. Do not leave the remote in a hot car or in direct sunlight. Lithium-ion batteries degrade faster in heat, and extreme cold can temporarily reduce charging efficiency.
Update tvOS regularly. Apple periodically releases fixes for remote connectivity and battery management. Keeping your Apple TV software current prevents known bugs from causing charging issues.
Apple TV Remote Not Charging – Frequently Asked Questions
What do I do if my Apple TV remote won’t charge?
First, switch from a TV USB port to a dedicated wall power adapter rated at 5W or higher. Second, try a different Lightning or USB-C cable (depending on your remote model). Third, clean the charging port with a wooden toothpick to remove lint or debris. If those steps fail, force restart the remote by holding Volume Down + Back button (Gen 2/3) or Menu + Volume Up (Gen 1) for 5 seconds.
How to fix a dead Apple TV remote?
Plug the remote into a wall charger for at least 30 minutes using a known-good cable, since a fully depleted battery needs time to reach a minimum charge. If it remains unresponsive, perform a force restart by holding the Volume Down and Back buttons together for 5 seconds (Siri Remote Gen 2 or 3) or Menu and Volume Up for 5 seconds (Gen 1). If the remote still does not respond after charging and restarting, contact Apple Support for warranty or battery service options.
Do Apple TV remotes go bad?
Yes, Apple TV remotes can degrade over time. The internal lithium-ion battery loses capacity after hundreds of charge cycles, typically over 2 to 4 years of regular use. Signs of a failing remote include rapid battery drain (lasting only 24 hours on a full charge), refusal to charge despite good cables and power sources, and intermittent connectivity drops. If your remote is under one year old and experiencing these issues, it may qualify for warranty replacement.
Can an Apple TV remote battery be replaced?
The Apple TV remote battery is not user-replaceable. The remote is a sealed unit with an internal lithium-ion battery. However, Apple offers battery service for remotes with degraded batteries, typically for a fee lower than buying a new remote. Contact Apple Support or visit an Apple Store to arrange battery service. If your remote is still under the one-year limited warranty or AppleCare+, the battery service may be covered at no additional cost.
Conclusion
Learning how to fix an Apple TV remote not charging comes down to three core principles: use a wall adapter instead of a TV USB port, keep the charging port clean, and know the correct button combination for your specific remote generation. The vast majority of charging failures stem from insufficient power delivery or simple cable issues, not actual hardware defects.
If your remote is within its one-year warranty or covered by AppleCare+, do not hesitate to contact Apple Support after trying the troubleshooting steps in this guide. There is no reason to live with a broken remote when Apple will replace defective units at no cost. For older remotes with degraded batteries, battery service or a new Siri Remote are both straightforward options that will have you back to streaming in no time.